Exhibit

Chapter 1: Preparing to Collect

“Before you go into the field, or your backyard, you must first get prepared!”

“You don’t need to spend a lot of money to collect and press plants. This activity is inexpensive and easy to enjoy, making this a very inclusive science.”

Photo of collecting tools

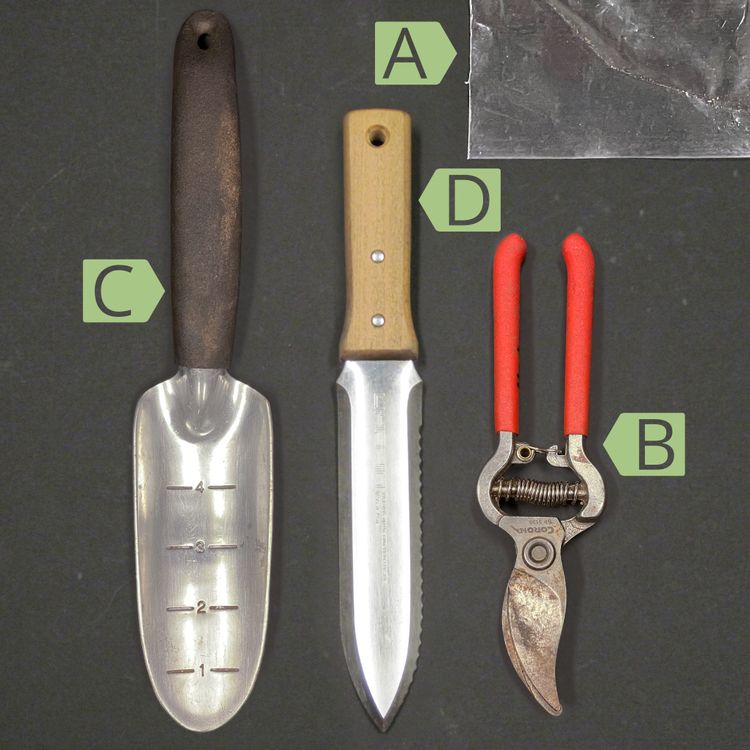
Tools for Collecting

  1. A) Plastic bags
  2. B) Secateurs
  3. C) Hand trowel
  4. D) Hori hori similar to a hand trowel, helps to dig underground plant materials, such as roots, bulbs, and rhizomes.
Photo of collecting tools

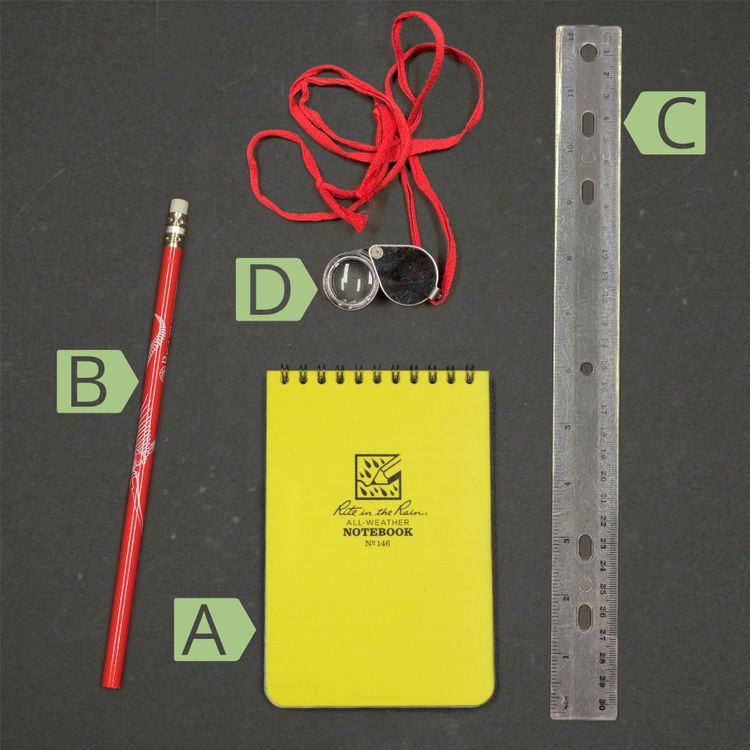
Tools for Documenting

  1. A) Waterproof field notebook
  2. B) Wooden pencils
  3. C) Ruler
  4. D) Hand lens (or loupe) is essential for seeing small features of a plant in the field. Wearing it like a necklace means you’re always prepared to have a quick “look-see”.

Responsible and Ethical Collecting

“Do your due diligence: understand protective agreements and apply for permits before you collect. While these actions did not always occur in the past, now is the time to Respect Where You Collect!

Chapter 2: Collecting Plants

“Why, What, When and How?”

“One of the first questions people ask me is “How do I collect?” Which is not just about how to collect but also why we collect, what to collect and when to collect. I appreciate this question as it means we are now at the really fun stage - collecting itself!”

Castilleja in the field.

needs to be filled

Castilleja collected into its individual bag with a tag written with its own unique collection number.

Chapter 3: Pressing and Drying Your Plants

“The next step is to press and dry the plants to create a specimen. To me, this is often the hard part. It takes time, patience and a certain feel and touch to make useful yet artistic specimens. Honestly, it will be trial and error.”

Photo of collecting tools

Pressing Supplies

  1. A) 2 lattice press backings
  2. B) Corrugated cardboard
  3. C) Foam
  4. D) Blotter paper
  5. E) Newsprint
  6. F) 2 straps with locking closures

A. Two lattice press backings make a lightweight frame that contains a stack of fresh plants in the process of being dried. B. Corrugated cardboard layers separate the specimens, distribute pressure, and allow for airflow. C. Foam helps to even out bulky specimens. D. Blotter paper helps the specimens dry more quickly and evenly. E. Newsprint - Each plant specimen is in between fresh newsprint to absorb moisture. F. Two Straps with locking closures keep pressure on the press, and can be adjusted as the press fills up.

How to Dry Your Pressed Plants

“Exsiccate: to remove moisture from, to dry”

“The key factors for a successful drying and pressing are consistent air flow, temperature, air humidity and even pressure across all specimens.”

Chapter 4: Mounting Your Pressed Plants

“I see the mounting phase as the true artistic stage of the process. This is where it all comes together - the pressed plant, and the collection information telling the story of how this became a magnificent specimen.”

needs to be filled

Mounting Supplies

  1. A) Archival tape / cut into strips
  2. B) Scissors
  3. C) Wet sponge
  4. D) Corrugated cardboard
  5. E) Mounting paper
  6. F) Specimen label
  7. G) Fragment packet
  8. H) Archival glue
  9. I) Tweezers
  10. J) Paper towels
  11. K) Weights

Herbarium mounting paper is made from cotton fibres only, is much thicker than normal paper, and has a neutral pH. Archival glue—white polyvinyl acetate (PVA)—dries clear, is acid and odour free, is water soluble, and does not become brittle with age and archival tape is water activated and dries very quickly.

needs to be filled

How to Mount Your Pressed Plants

“Before mounting begins, you will need to consider space for all the pieces that make up the specimen: your pressed plant and its label, the fragment packet, the collection stamp and any future annotation labels that will be added if you donate your specimen to an institution.”

“A specimen label includes all the collection information about the plant. Fragment packets are small paper envelopes useful for holding plant material like flowers or leaves that have fallen off the specimen and can’t be reattached. Weights can be handy when you need to weigh the plant down while the glue dries.”

Chapter 5: Preserving and Organizing Your Collection

“Now that you have put all this hard work into your collection, how will you take care of it? To preserve your collection for the long term, you must freeze and store your specimens properly. I often tell people we have no idea how long a cared-for collection will last or how useful yours will become, so take good care of your specimens.”

Photo of collecting tools

Specimens of the same species are kept inside a lightweight, non-acidic (archival) species folder. All the species folders are placed together into a genus folder made of thicker card stock. The folders are labelled at the bottom and cover the sheets completely to prevent UV light damage. Our collection folders also have a coloured band to help us organize our collection by geography. Green is for British Columbia.

Chapter 6: Identifying Your Specimen

“Let me start off by saying that there are an estimated 300,000 flowering plant species in the world. This number does not include conifers or ferns, which make up another 15,000. Putting a name to a plant is no small task. It will require time and patience, but it will be well worth the effort.”